


How To Dollar Cost Average Into Crypto Using Uniswap V3
A step by step guide showing you how this is done

Uniswap V3 offers one of the coolest ways to get exposure to your favourite assets and dollar cost average (DCA) into the market whilst earning fees alongside.

Today I’ll explain how you can do this with a step by step guide.
This strategy can be done on any of the following chains with any 2 assets of your choice (one asset gets converted into the other so often you might want to do this with a stable coin and then the asset of your choice). This is also a strategy for sideways or downtrending markets only.
Background:
To appreciate and understand the strategy, you need to first of all understand what Uniswap is and how version 3 works. If you already know what Uniswap is and what V3 is, skip below to the step by step guide.
Watch my video on it here - Uniswap V3 Explained
In summary for those with limited time to watch, Uniswap is an exchange where you can swap one asset for another. It is available on a variety of blockchains including Arbitrum, Optimism and the new Base chain. When you perform a trade there are trading fees which go to the users who provide the liquidity for the assets you’re trading against.
V3 introduced a concept known as concentrated liquidity, where you could provide liquidity within a certain price range rather than the entire price range and therefore your liquidity has a greater impact when the price of the asset is within that range. Of course it is also much more capital efficient & therefore can offer higher APRs.
How does this strategy work?
This works because on Uniswap V3, with concentrated liquidity, we can select ranges outside of the current market price. For example with an ETH - USDC pool, a user can provide liquidity for ETH at a range of $500-1200. (current ETH price is $1700).
Therefore when outside of the range, a users position is composed of 100% of one asset and 0% of the other. We can use this to our advantage as we can use strategies like the one we’re talking about today, to go from let’s say, 100% USDC → 100% ETH, as the price of ETH changes from it’s current at $1700 to $500 (as mentioned above) which would be the bottom of the range.

(In the above image, the position will be 100% USDC & 0% ETH at $1200 and 0% USDC & 100% ETH at $500.)
It’s important to remember when selecting a range, the range itself is what tells you the composition of asset A and asset B. For example, lets say an ETH range of $500-$1200. At the price of 500$ per ETH your pool will be 100% ETH and at $1200, it will be 100% USDC. As you can imagine this means when price is in the middle at $850, the pool will consist of an equal 50:50 split of ETH and USDC.
This is why this strategy only works in a sideways market (where you can continue earning the trading fees for that pair) or in a downtrending market where over time you position should go from 100% USDC to 100% ETH if the price manages to reach the bottom of your range.
If you have any further questions regarding this, please ping me a message on Twitter.
Step by Step Guide:
Head to Uniswap and to the pool tab where you can then select ‘+ New Position’.

Select the assets you’d like to do this with. In this example I am going to pick MATIC and USDC (as I’d like to use my USDC to accumulate more MATIC here)

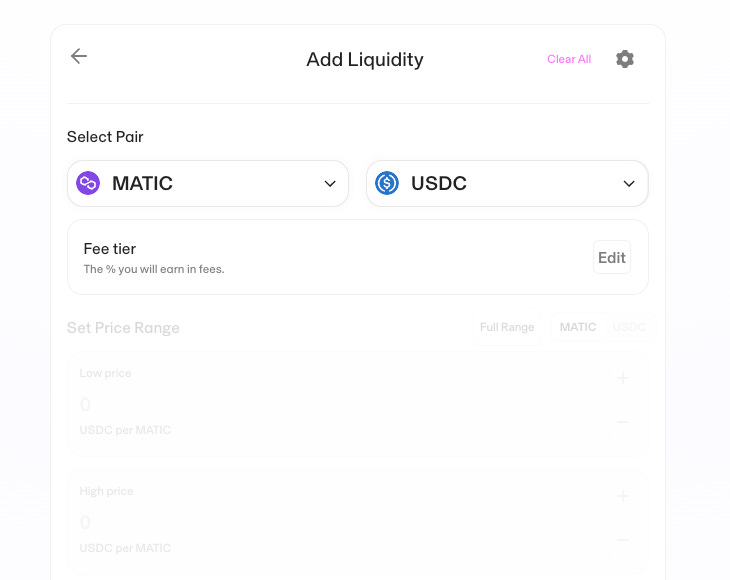
Select the fee tier. This essentially refers to how % of each transaction other users do against your liquidity you want. Generally the rule of thumb is the more stable the asset, the lower fee tier you select and the more exotic the asset the higher fee tier you pick. You can take a look at other similar pools on Revert Finance to see what fee tier offers the best fees for you overall.

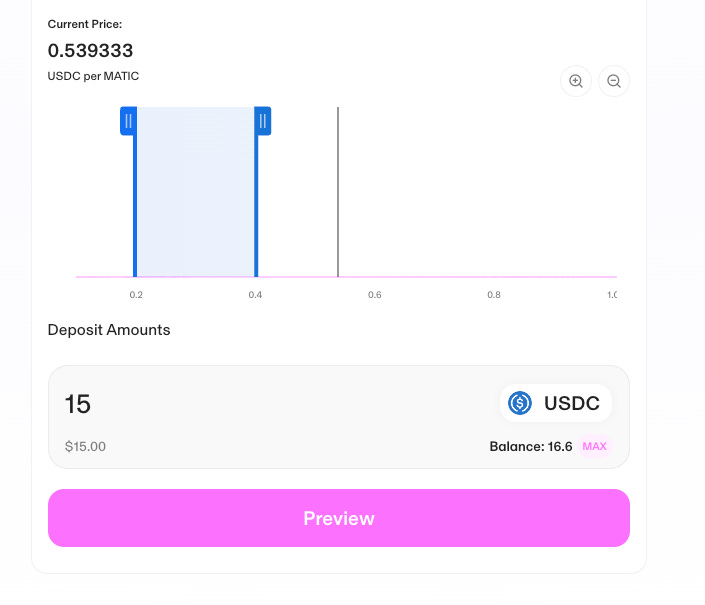
Select the price range you would like for your DCA process. As of writting, $MATIC is currently at $0.539 per token. You can select a range from the ‘lowest’ and ‘highest’ price you want your liquidity to be active. It is important to pick these wisely as these are your reference for entry and exit when it comes to this DCA strategy.
As you can see in the below strategy, I have selected a range of $0.2 - $0.4.
What this means is that when the price of Matic reaches $0.4. My USDC deposit will start to get converted into Matic. It will start with 100% USDC and 0% Matic.
Only when Matic reaches $0.2 will it be the opposite and my position will be 100% Matic and 0% USDC.

Deposit USDC and pay the transaction fee.

Once your assets have been added to the pool you will mint an NFT that represents your Uni V3 Liquidity and a new interface can be opened. Wait for the price to reach your selected range. Whilst it is in the range it will also start earning trading fees. Which you can then collect.

Risks:
There are a number of things you need to be aware of when using a strategy like this. Here are some of them.
Impermanent loss - the assets in combination within the liquidity you have provided may cause you to loose more money than you would have had you just held the assets themselves
If the price appreciates, your position could be sold off and therefore your technically Dollar Cost Averaging OUT, rather than INTO an asset
Smart Contract and Blockchain risk → This is the same thing you need to consider when using any DeFi application
Slippage, especially if trying this with a very low liquidity pools
Gas fees especially on Ethereum mainnet when it comes to approving, depositing, claiming fees and then withdrawing. Trust me, these add up a lot.
So that’s the strategy in a nut shell. I hope you find this useful and perhaps you can benefit from it. If you have any questions, let me know! Happy to help wherever I can.
Very good.
DCA power!